Creating, discovering and sharing food

Latest

OMG Salted Caramel Butter Bars

This slideshow requires JavaScript.

My lady friends and I recently enjoyed our annual holiday pot luck ornament exchange and these bars were one of the highlights of the evening.  Everyone who took a bite said the same thing…OMG!  So I added my touch to the name and decided to call them OMG Salted Caramel Butter Bars.  The crust alone calls for an entire pound of butter and 2 tablespoons (not teaspoons) of vanilla….need I say more :o)

This recipe was posted by Cookies & Cups who found it on another blog, who found it on another blog…you get the idea.  This recipe is worth passing around…

OMG Salted Caramel Butter Bars

Ingredients for the Crust:

    • 1 lb. salted butter room temp
    • 1 cup sugar
    • 1½ cups powdered sugar
    • 2 Tbs vanilla
    • 4 cups all purpose flour

To make the Crust:

    1. Preheat oven to 325 degrees
    2. In a large bowl, combine the butter and sugars.
    3. Using mixer on medium speed, beat together until creamy.
    4. Add the vanilla and beat until combined.
    5. Sift the flour into the butter mixture and beat on low speed until a smooth soft dough forms.
    6. Spray a 9×13 inch baking pan lightly with non-stick cooking spray.
    7. Press one-third of the dough evenly into the pan to form a bottom crust, and place the remainder of the dough in the fridge to chill.
    8. Bake until firm and the edges are a pale golden brown approx 20 minutes. Transfer pan to a wire rack and let cool about 15 minutes.

Ingredients for the Filling:

    • 1 bag (14 oz.) caramel candies (about 50 individual caramels), unwrapped
    • 1/3 cup milk or cream
    • ½ teaspoon vanilla
    • 1 T. coarse sea salt

Making the Filling and Wrapping it Up:

    1. While the bottom crust is baking and the remaining dough is chilling, make the caramel filling. Place the unwrapped caramels in a microwave-safe bowl.
    2. Add the cream and vanilla.
    3. Microwave on high for 1 minute.
    4. Remove from the microwave and stir until smooth.
    5. If caramels are not completely melted, microwave on high for 30-second intervals, stirring after each interval, until smooth.
    6. Pour the caramel filling over the crust.
    7. If you are going to salt the caramel sprinkle it on caramel layer now.
    8. Remove the remaining chilled dough from the refrigerator and crumble it evenly over the caramel.
    9. Return the pan to the oven and bake until the filling is bubbly and the crumbled shortbread topping is firm and lightly golden, about 25 – 30 minutes.
    10. Let cool before cutting into squares.

Variations

Playing with Extracts. Feel free to replace a portion of the vanilla with some different extracts and flavorings like almond, maple or orange.

Nuts for nuts. Mix some toasted nuts in with the dough – chopped almonds, walnuts or pecans would be devine!

Grate some Rind. Caramel and orange go well together, so consider adding some grated orange rind to the dough.

Top it Off Right. Drizzle the top with some dark or milk chocolate, white chocolate or a drizzly white icing for a gorgeous and delicious finish to a perfectly sinful bar.

Warm it Up. Warm these babies up and serve with a spirited warm beverage.

What a perfect end to a great evening!   Happy Holidays!  

The best surprises come from happy accidents!

Five Spice Asian Beef Noodle Soup

Soup weather has arrived, and boy have I had a craving for a good Asian Beef Noodle Soup.  This recipe hit the spot!  Asian dishes are warm and satisfying during the colder months…maybe its the spices, or the noodles, or both.  This soup has a broth base, but its packed with beef, vegetables, and noodles.  So much so that you can eat it with a fork…then slurp the rest.  Hearty and delicious, it pulls together very quickly, and tastes even better the next day.

Five Spice Asian Beef Noodle Soup

(Cooking time 20 minutes, Serves 6-8)

  • 8 ounces boneless beef sirloin, thinly sliced against the grain
  • 1/3 cup soy sauce
  • 8 cups beef stock
  • 2 tsp fresh grated ginger
  • 3 garlic cloves, minced
  • 1-1/2 tsp five spice powder
  • 1-2 tbsp brown sugar (rounds out the flavors)
  • 1 tbsp sriracha sauce, or to taste (optional)
  • 2 cups rice vermicelli, broken into 3-inch pieces
  • 2 carrots, julienned
  • 2 cups napa cabbage or 2 cups bok choy, shredded
  • 2 cups bean sprouts
  • 1/4 cup chopped fresh cilantro
  • 3 green onions, sliced
  • 1 tbsp toasted sesame seed oil

Directions:

  • Cut beef into very thin strips. In a bowl, combine beef with soy sauce, sriracha sauce, five spice powder and brown sugar.
  • In a large saucepan over high heat, bring stock, ginger and garlic to a boil. Add vermicelli; boil for 2 minutes or until softened. Add beef, carrots and cabbage.
  • Return to a boil; cook for another 2 minutes. Add bean sprouts and cook for 1 minute or until heated through.
  • Stir in sesame oil.
  • Ladle into bowls; garnish with cilantro and chopped green onions.

Variations

Chicken, Pork, Beef, Seafood or Tofu?  Use any meat or vegetarian protein you want for this. Just use a stock/broth that matches your protein – chicken, beef, vegetable, fish?

Just Veggin’.  Like I said, this soup is packed with veggies – but don’t limit yourself to what’s listed above.  How about adding some water chestnuts, mushrooms, seaweed, green beans, julienned daikon radish, bamboo shoots, spinach, snow peas, or other types of cabbage?

Noodles or Rice?  So many different noodles to choose from…ramen noodles, angel hair or vermicelli pasta, or other types of rice noodles – thick, thin, long, short.  Or what about rice?  Who says it has to be a noodle soup?  Add a cup or two of rice and let it simmer, lid on for about 45 minutes.   Or cook up some rice and ladle the soup over top.  You could add some chinese pork or vegetable dumplings too the soup as an alternative to noodles.

Egg Drop anyone?   Beat an egg then drop it in and stir into the hot soup just before serving for an egg drop soup.

Spice it up.  Add more heat with some thai chilies, more sriracha sauce, red pepper flakes, or your favorite ginger habanero hot sauce.

Next time you crave some asian comfort food, throw together your own version of this healthy, hearty, satisfying soup.  No matter how you make it, this soup will be enjoyed all week.  It’s great comfort food that lends itself well to endless interpretation.

The best surprises come from happy accidents! 

Raining Tomatoes Part 3: Oven Roasted Tomatoes

I should know better than to promise a series of anything.  Life always gets in the way and poof, tomatoes turn into pumpkins.  Since I have no pumpkin recipes to share, I’m picking the ball back up and moving forward with tomato recipes, all of which are still perfectly palatable during the fall season and can be easily resurrected come tomato season next year!

Oven roasted or dried tomatoes is a lazy recipe that I use when I’ve had it up to my eyeballs with canning.  I simply mix ’em up and roast (or dry) ’em in the oven.   Dried cherry tomatoes are like savory candy, and the larger tomatoes still have a sweet meaty quality that’s delicious when sliced for appetizers, in salads, for pasta, pizza – you name it.   No sun required!

Oven Roasted (or Dried) Tomatoes

  • 12  Roma tomatoes or round red tomatoes, or 24-30 cherry tomatoes
  • 2-3 tbsp olive oil
  • 1 tsp kosher salt
  • Coarse ground black pepper
  • 3  cloves crushed garlic (optional)

Roasting

  1. Line baking sheet with parchment paper.
  2. Preheat oven to 400F.
  3. Slice and core larger tomatoes, or halve cherry tomatoes. Place on parchment-lined baking sheet.
  4. Drizzle with olive oil; sprinkle with coarse salt, pepper and garlic.
  5. Bake 30 to 60 minutes, until juices have evaporated.
  6. Store in a plastic zip-top bag in refrigerator or freezer.

Slow Roasting or Drying 

  1. For drier, more condensed flavor, try the low and slow method.
  2. Line baking sheet with parchment paper.
  3. Halve or quarter your larger tomatoes, keep cherry tomatoes whole (keep size consistent for each batch) and add to a large bowl.
  4. Drizzle with olive oil; sprinkle with coarse salt, pepper and garlic and toss with your  hands.
  5. Neatly lay the tomatoes out onto the baking sheet.
  6. Roast at 250F oven 3 to 4 hours, or longer if you prefer to dry them.  Sometimes I’ll leave them at 200F overnight and they’re ready the next morning.

Tips:

  • Convection ovens work well for this as the heat is distributed more evenly in the oven.  If you don’t have a convection oven, then be sure to rotate your baking sheets every few hours to ensure even roasting/drying.  Do not let them dry out too much as they will become bitter.  You still want them to be soft, meaty and flavorful.
  • Don’t worry too much about overcrowding on the baking sheet.  They’ll shrink down considerably as they roast.
  • Parchment is absolutely necessary, or you’ll have a mess on your hands afterward!

Storage:  Store in the freezer in an air tight container, or keep handy in the fridge.

Variations

You can change a number of things for this recipe:

Texture and juiciness – for fresh roasted tomatoes that are still plump and juicy, roast at higher temperature for less time.  For dryer, chewier tomatoes, roast at a lower temperature for several hours.  The times and temps above are just guidelines.  All ovens are different, so keep close watch over your tomatoes the first time around and you’ll get a feel for how long and how hot the oven should be to reach the texture you want.

Different flavors – You can always add herbs – basil, dill, oregano, parsley.  Finely chopped works best.  You can even mix in some chopped chipotle, hot sauce, or balsamic vinegar.  Don’t make it too juicy – just enough to coat the tomatoes so the flavor adheres.

Size doesn’t matter – smaller means less cooking time, larger means more cooking time.  You can cut whole tomatoes down to smaller chunks, keep them whole.  The key is keeping the sizes consistent so they cook evenly.

Taking ’em to the Next Level – Being a huge fan of chipotle peppers, I couldn’t resist trying my chipotle recipe using dried tomatoes.  Since I’ve never seen or heard of anyone doing anything similar, I am proclaiming myself as the inventor of ….Tomotle!  Yes, it’s a condensed tomato-based condiment that really livens up the flavor of any tomato recipes.  I add it to sauces, hummus, dips, salsas, bruschetta….anything you’d add dried or sun dried tomatoes to.  I love it!

So there you have it.  Roasted or dried tomatoes are great for snacking, blend, slice, dice, or throw ’em in salads, dips, appetizers, sauces, pizzas…anything that could use a zip of flavor.  Easy peasy and a great fast way to use up those excess tomatoes!

The best surprises come from happy accidents! 

Raining Tomatoes Part 2: Fresh Creamy Tomato Soup

Finally!  Recipe 1 of my Raining Tomatoes series….more like it’s been raining ON my tomatoes…nonstop…for what seems like two weeks now!

All flooding and front yard ponds aside, this is perfect soup weather!  Tomato soup baby! With grilled cheese sandwiches for dipping!  Woo hoo!

I have a favorite recipe for tomato soup that uses up those fabulous fresh garden tomatoes, and fills the pantry with much needed reserves for the winter months – it’s fresh, it’s healthy, it’s easy, and it’s as delicious as you’ll find in any hoity toity restaurant.  So here we go..

Very Fresh Cream of Tomato Soup

  • 12 very ripe tomatoes, peeled and cut up
  • 1 cup water or stock
  • 1 cup sliced celery
  • 1/2 onion, sliced
  • 1/4 cup fresh parsley, minced

Simmer above ingredients for 30 minutes.  Puree and strain.

  • 3 tbsp cornstarch
  • 3 tbsp butter, melted

Mix cornstarch and butter.  Stir into soup to thicken over medium heat.

  • 2 tbsp brown sugar
  • 2 tsp salt

Fresh ground black pepper to taste

Add sugar, salt and pepper.  Freeze or can at this point, if desired.

  • 2 cups light cream
  • 1 egg yolk, beaten

Stir into very hot soup.  These measurements are for the entire pot.  Adjust for smaller portions.

Serves 6-8.

Variations

You’ve probably figured out by now that I don’t get too crazy with the variations when it comes to good simple recipes, but I’ve gotta give it my best shot…

Fresh herbs and tomatoes…you can’t go wrong with fresh tomatoes and fresh herbs.  Throw in basil, oregano, chives…

Cheese it up.  Again, how can you go wrong?  Add shredded asiago, parmesan, chunks of buffalo mozzarella, or how about cheddar or swiss with a toasted ham and matching cheese sandwich.  You gotta have a sandwich!

Throw in some freshly toasted croutons.  Just chunk up some old bread, toss it around with garlic, olive oil, maybe some crushed red pepper, then brown them up in the skillet.

Make it a Gratin.  Add your soup and croutons to a crock and throw a big slice of cheese over top, then give it a quick broil in the oven for a yummy gourmet tomato soup gratin.  Mmmmm…the kiddies will devour their soup so fast, they won’t even realize it’s made of veggies.

Spice it up.  Add some hot sauce, crushed red pepper, or even chipotle for some delicious sweet smoky heat.

If you like it fresh, then you’ll love this recipe.  Comforting, delicious, and great for a rainy day, week, or month.  Did I mention it goes great with grilled cheese???

The best surprises come from happy accidents!

Raining Tomatoes Part 1: The Game Plan

When the garden rains tomatoes, you need a game plan.  Last weekend alone, we picked a good bushel and a half of tomatoes.  Don’t get me wrong…this is a great problem to have.  But unless you want a garage full of fruit flies, you need to use them fairly quickly.  So what’s our game plan?  Canning…lots and lots of canning.

We’re veterans in this arena – I’ve canned for years and have a stack of fair ribbons (including a best of show) stashed away somewhere that demonstrate my love and passion for the sport.  Yes, canning is practically a sport.  It demands focus (the hubster helps with that), blood (from the chopping), sweat (from the heat), tears (from the onions), and a few 2nd and 3rd degree burns.  At the end of the day, I’m spent.  But nothing is more gratifying than viewing rows of jars filled with gourmet goodness.

I could can tomatoes blind folded, and most of my recipes aren’t even recipes.  In fact, when asked for recipes, I’m usually at a loss.  It’s all improv baby!  Salsas and sauces are concocted on the fly — luckily I have good cooking intuition and guidance from my grandmother Pauline, who I am certain takes charge from above when I’m on autopilot in the kitchen.

I actually have another secret weapon filled with ideas for using up those garden veggies.  A long time ago, as an impromptu gift, I received a book called…

Too Many Tomatoes, Squash, Beans, and Other Good Things:
A Cookbook for When Your Garden Explodes 

by Lois M. Landau (Author), Laura G. Myers (Author)

This is the best book I’ve ever seen for using the garden veggies, and every recipe that I’ve tried (and I’ve tried many) is delicious!  If you’re a gardener who seeks new ideas for using those veggies, by all means, score yourself copy of this book.  It’s worth every penny.

In the meantime,  I will dedicate my next few post to some great tomato-focused recipes that will help solve your overabundance issues and leave you with some exceptionally tasty dishes that can be enjoyed straightaway, or preserved for another season.  So stay tuned!

The best surprises come from happy accidents!

Southwest Zucchini Chicken Enchiladas

As with most of our zucchini recipes, Zucchini Chicken Enchiladas originated from a desperate need to use up a huge overabundance of garden zucchini.  I was born a Texan…once a Texan, always a Texan, which means I was weened on guacamole and enchiladas.  I love southwest food, and although this recipe is more of an Americanized casserole that uses some southwest spices and tortillas, it still satisfies my cravings for southwest food.  And it’s actually a pretty healthy recipe that sneaks in some extra veggies, doesn’t use much fat, and packs tons of flavor.

Southwest Zucchini Chicken Enchiladas

Zucchini Filling

1. Preheat the oven to 375 degrees.

  • 1 small onion, roughly chopped
  • 4-5 garlic cloves, chopped
  • 1 tbsp olive oil

2. Saute onion, garlic, and oil in a skillet on medium heat until the onions are translucent.

  • 3 cups shredded zucchini
  • 2 tsp chopped cilantro
  • 1 tsp salt

3. Add zucchini, cilantro and salt to the onion mixture and cook down on medium high heat for about 5-8 minutes until all the moisture has evaporated and the mixture is soft and somewhat caramelized.

4. Set aside.

  • 2-4 chicken breasts

5. Add the whole chicken breasts to the sauce (recipe below)

6. Bring the sauce to bubbling simmer on low heat and poach the chicken for about 20 minutes until it’s cooked and starts to pull apart on top when removed from the liquid.

7. Remove the chicken from the sauce and set aside.

8. Remove the sauce from the heat and stir in the chocolate and cilantro. Stir until the chocolate is melted and set sauce aside.

9. Using two forks (one in each hand), shred the chicken as fine or as chunky as desired.

10. Stir shredded chicken into the zucchini onion mixture.

Enchilada Sauce

  • 4 cups of crushed tomatoes or tomato sauce
  • 2 tsp chili powder
  • 2 tsp chopped chipotle
  • 1/2 tsp garlic powder
  • 1/2 tsp onion powder
  • 1/2 tsp ground cinnamon
  • 1 tsp salt
  • 1 tsp sugar
  • 1/2 oz unsweetened baking chocolate
  • 2 tbsp fresh cilantro, chopped

1. Combine all sauce ingredients, except the chocolate and cilantro, in a medium saucepan.

2. Bring the sauce to bubbling simmer on low heat and cook with the chicken poaching in the liquid, as described above, for about 20 minutes.

3. Remove the sauce from the heat, remove the chicken breasts, and stir in the chocolate and cilantro.

4. Stir until the chocolate is melted and set sauce aside.

Assembly

  • 8 – 10 corn tortillas
  • 2 cups shredded cheddar cheese, reserve 1-1.5 cups for top of casserole

1. Line the bottom of a 9″ x 13″ baking pan or casserole dish with a ladle of sauce.

2. Microwave the stack of tortillas for 15-30 seconds until they are warmed and softened.

3. Take one tortilla in the palm of your hand, and with the other hand, spoon about 1/4 – 1/3 cup of filling into the center of the tortilla.

4. Sprinkle about 2 tsp shredded cheese over the filling.

5. Roll the tortilla around the filling and lay it in the dish seam side down.

6. Continue steps 1-5, arranging the enchiladas in a row neatly across the pan and filling in the empty spaces.

7. If you have extra filling, neatly tuck the filling into the nooks and crannies over top and in between the enchiladas.

8. Ladle the sauce generously across the enchiladas, covering the surface.  Gently knock the bottom of the dish against the counter to work the sauce down between the enchiladas.

9. Spread reserved cheese evenly over top of the casserole.

10. Cover and bake the casserole for 15 minutes, then uncover and bake an additional 20-30 minutes until the top is browned and bubbling.

11. Remove from the oven and allow to sit for 5 minutes before serving.

Variations

Lots of adjustments can be made while still keeping with the southwest enchilada theme.

Saucy Mods.  My sauce is tomato-based, but you can certainly use a chili-based sauce using dried red chilies, or try a verde (green chili) sauce.  In New Mexico, they ask if you want red, green or Christmas.  Christmas means red and green – a fun idea if you want some added color or just can’t decide between the two.

Chicken Not Required.  Shredded pork, beef, carne asada, chorizo, bacon, even shrimp or scallops would be great.  Or make it extra cheesy zucchini enchiladas.  Yum!  Substitute the meat and cheese with vegan options, and you have a great meatless meal.

Pick a Cheese.  Swap the cheddar for monterey jack, queso fresco, american cheese, chile con queso, or dare I say it….Velveeta!

Wrap it Up.  Enchiladas are traditionally made with corn tortillas, but consider the different varieties of flour tortillas that are available.  Or how about no tortillas?  The filling it tasty enough, layer it with sauce and cheese and bake it up for a southwest veggie casserole.

Add More Veggies.  You can add more veggies during the initial saute – think hot chili peppers, sweet peppers, spinach, shredded potato, corn, and green onion.  Or be adventurous and try some of the unusual southwest veggies and squashes that are readily available in so many large grocery stores.

It’s a multi-step recipe, but it makes a lot and is well worth the effort.  Zucchini Chicken Enchiladas also freeze well.  Make them in bulk and pack them away for later, or take them to your next pot luck.  And if your friends ask for the recipe, just send them back here to Cooking at the Improv!

The best surprises come from happy accidents!

Roasted Cheese Stuffed Chili Peppers

We recently had the cheese stuffed banana peppers appetizer at Frederick’s new Roast House Pub restaurant in Frederick.  Two of our favorite things – soft roasted hot peppers and cheese.  The hubster and I looked at each other and said “we can make these”.  And wouldn’t you know?  Our banana peppers and chilies just happen to be ripening in the garden.  Perfect timing for our own roasted cheese stuffed chili fest.

Here’s what we came up with…

Roasted Cheese Stuffed Chilies

Preheat oven at 375 degrees.

Prepare 12 fresh banana peppers or long chilies, or 24 jalapenos by slicing the tops off to fill from the top, or slice them down the side to fill from the sides.

Saute the following in a skillet until caramelized:

  • ½ medium onion, sliced
  • 4 cloves garlic, chopped
  • 1 tsp. olive oil

Add the caramelized onion mixture to the following ingredients in a food processor and blend smooth.

  • 4 oz cream cheese
  • ½ cup Monterey jack cheese, shredded
  • ½ cup sharp cheddar cheese, shredded
  • 2 tsp. chipotle

Stir in the following ingredients with a spatula or spoon:

  • 3 oz. crumbled bacon (we used the ready to eat crumbled bacon in a bag)
  • ½ cup canned corn, sautéed in the skillet
  • ¼ cup chopped cilantro

Stuffing the Chilies

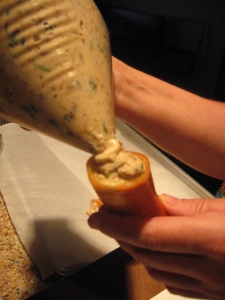
– Add the filling to a Ziploc bag.  Press air out the top and zip closed.

– Cut one of the bottom corners of the bag to create a ½ inch hole.

– Twist the top of the bag and press out the filling into the peppers, either from the top (add enough filling so the top will stick when placed back on the pepper) or along the sides and insert a toothpick to keep them closed.

– Set the stuffed chilies upright in a chili roaster rack or lay them on their sides on parchment.

– Roast chilies for 40 minutes or until they’re soft and cheese is melted and crusty.

Variations

Can I just say “holy bajeebers” these things are GOOD! I personally would not change a single thing on this recipe; however, that would defeat the purpose of this blog, so here are a few ideas for variations.

Smoked vs. Baked.  They’re fantastic roasted in the oven, but just imagine them infused with smoked flavor on the smoker.  Everything is better when it’s cooked outside, right?

Bacon or No Bacon?  It’s hard to say “no” to bacon, but you can always swap it out for crab or shrimp, sausage, chorizo, chicken, ham or pork.  Or don’t add any meat at all.

Dip it.   Seriously, the filling alone would make a fantastic baked queso dip.  A guaranteed hit at any party.

Stuff More Than Peppers.  The filling could also be used to stuff just about anything that’s stuffable – peppers, tomatoes, zucchini, zucchini flowers, enchiladas, chili rellenos.

Mac and Cheese.  Stir it into some pasta and make a special baked mac and cheese.  Yum!

Double the recipe and it’s a party.  These Roasted Cheese Stuffed Chili Peppers are easy to make in volume, plus the stuffed peppers and the leftover filling will freeze well for later.   So start picking those garden fresh peppers and whip up a batch for your next social gathering, or in our case, a casual weekend meal for two.  Enjoy!

The best surprises come from happy accidents.

Italian Baked Tomato, Corn and Cheese Tortellini

Another garden fresh recipe that we only seem to make when the cherry tomatoes begin to ripen.  Our Italian Baked Tomato and Corn Cheese Tortellini is fresh, simple, delicious and satisfying.  It’s perfect for brunch, lunch or dinner; meatless mondays; vegetarian visitors (assuming they eat cheese); or just a nice easy meal for two paired with a high end beverage (we like beer) and a fresh side salad.  As with most pasta dishes, the leftovers are just as good the next day, and of course fresh tomatoes, basil and garlic make all the difference.

Italian Baked Tomato, Corn and Cheese Tortellini

Ingredients

  • 1/2 cup fresh basil, chopped
  • 4-6 cloves of fresh garlic, minced
  • 2 tbsp olive oil
  • 1/2 tsp salt
  • 3 cups cheese tortellini, cooked and drained
  • 1-1/2 cups cherry tomatoes, halved longways
  • 2/3 cup canned corn (we like Del Monte’s Summer Crisp)
  • 3/4 cup white cheddar cheese, shredded

Instructions

  • Preheat the oven to 375 degrees F.
  • In a large bowl, combine the basil, garlic, olive oil and salt.
  • Add the tortellini, tomatoes, corn and half of the cheese.  Gently toss everything together.
  • Pour the mixture into a 9×13 casserole dish.
  • Sprinkle the remaining cheese evenly over top.
  • Bake uncovered for 20-25 minutes, until cheese is browned.

Serves 4-6.

Variations

More veggies please. You can go crazy with the veggies in this dish. Sauteed mushrooms, roasted zucchini, eggplant, red pepper, asparagus, artichoke hearts, black olives, sun dried tomatoes, peas, and the list goes on and on. You can even add tomato sauce, top with cheese and bake it like a lasagna.

Cheesing it up. Swapping cheeses is a great way to add some really interesting flavors to this dish. Try salty feta, earthy goat cheese, smoked mozzerella, parmesan, gruyere, asiago, monterey jack, colby, or swiss.

Meatless no more. Add some heartiness with chopped or cubed ham, shredded chicken, ground italian sausage or lamb, kielbasa, or chorizo. Or lighten it up with fresh shrimp, clams, calamari, bay scallops, or even anchovies.

Feeling herbaceous? Add chopped chives, fresh flat leaf parsley, oregano, tarragon, or some different types of basil. Or how about mint leaves with ground lamb and sauteed eggplant?

Don’t like tortellini?  Try penne, rigatoni, rotini, fusili, gnocchi, or other types of pasta or dumplings.

Just keep a bag of frozen tortellini around, and throw this recipe or a variation of this recipe together with whatever you have in the fridge or cupboards.  It’s a great simple tasty dinner in a snap.

The best surprises come from happy accidents! 

Garden Veggie Roast

One day you’ve got zero zucchini, the next day you’ve got ten…the size of my drumstick!   Along with a wagon load of basil, and a few fingerling eggplants that require pinching…what to do, what to do?

Simple, rustic, fresh, flavorful – there’s nothing like a big pot of garden veggies roasted with fresh garlic and herbs.  Here’s a fabulous healthy side dish that’s easy to throw together with whatever you have available in the garden or fridge.

Mediterranean Veggie Roast

Ingredients

  • 1 large zucchini, cubed
  • 4 fingerling eggplants, sliced or 1 small eggplant, cubed
  • 1 small sweet onion, halved and sliced
  • 1 sweet red bell pepper, sliced
  • 1 sweet green pepper, sliced
  • 12 or more whole garlic cloves
  • 1 tbsp fresh chopped chives
  • 1/2 tsp fresh chopped oregano
  • 1/4 cup fresh sliced basil
  • 2 tbsp fresh flat leaf parsley
  • 1/4 cup olive oil
  • 1/4 cup balsamic vinegar
  • 2 tsp salt
  • Fresh cracked black pepper to taste.

Instructions

  1. Preheat the oven to 425 degrees.
  2. Mix ingredients well by hand in a large bowl.
  3. Transfer to a large casserole dish.
  4. Bake covered for 30 minutes, then remove cover.
  5. Continue to roast the veggies uncovered for another hour or more, stirring every 30 minutes.
  6. The finished veggies will be soft and saucy.


Variations

You can serve these veggies up as they are, or jazz them up…

Cheese Please.  Add fresh crumbled feta, parmesan, asiago, fresh buffalo mozzerella, or goat cheese.

Flavorful Additions.  Throw in some fresh herbed and buttered croutons, sun dried tomatoes, capers, artichoke hearts, marinated mushrooms, or calamata olives.

Make it a Meal.  Add a little protein, some fresh salami, sliced italian sausages, shredded chicken or pork, bratwursts, prosciutto, or anchovies.  Or make it vegetarian with cannellini beans, garbonzo beans or lentils.

Chunked, cubed, sliced, or whole, there are no rules for this recipe and there’s no hard core list of ingredients.  An hour or two of roasting time in the oven and you’ll have a delicious medley of flavors and textures that’ll excite guests and get the vino flowing.  Enjoy!

The best surprises come from happy accidents.

Colorful Asian Slaw with Creamy Miso Dressing

I often prefer slaw over leafy salads. I just think they’re more substantial in terms of flavors, textures, and colors. Plus, they can be made ahead, they hold up well to travel, and they keep longer.  Its no wonder cole slaws are so popular for pot lucks and cookouts.

It’s also incredibly versatile. The variations of veggies, herbs, dressings, fruits, nuts, and seeds are endless, and are easily appeasing to meat eaters, vegetarians and vegans alike.

The following Asian Slaw recipe is simple, sweet, and full of color and texture.  I usually pack it in a ziploc bag and keep it on hand in the fridge to add a little crunch to my salads or for a quick and healthy side slaw at evening meals.

I’ve also been searching for a miso dressing recipe to add to my Asian slaw. You know, that delicious creamy miso dressing served on side salads at Japanese restaurants? It has such a unique nutty asian flavor and it’s creamy with shreds of fresh ginger throughout. By pure coincidence, I stumbled across Lisa’s Kitchen blog.

Bingo! Thank you Lisa! This is exactly what I was looking for. It’s just like the restaurant version, only better. And once you’ve located all of the ingredients, it’s incredibly easy to make.

Asian Slaw (without the dressing)

  • 1 small head savoy cabbage, thinly sliced
  • 1/2 small head red cabbage, thinly sliced
  • 4 large carrots, peeled and shredded
  • 3/4 cup chopped cilantro
  • 1 bunch (4-5) green onions sliced

Combine ingredients in a large bowl. Dress with miso dressing (recipe below) or other dressing of choice, and serve.

Creamy Sesame Miso Salad Dressing

From Lisa’s Kitchen at:  http://foodandspice.blogspot.com/2008/07/creamy-sesame-miso-salad-dressing.html

  • 1/2 cup spring water
  • 1/4 cup rice vinegar
  • 1/4 cup miso
  • 1/4 cup tahini
  • 2 green onions, sliced, both green and white parts
  • 2-inch piece fresh ginger, finely grated
  • 2 teaspoons sugar
  • 1/4 teaspoon cayenne
  • 4 tablespoons sesame oil
  • 2 tablespoons toasted sesame oil
  • 1/4 cup sesame seeds
Just whisk the ingredients together until smooth and creamy and add to your slaw.  The sesame seeds can be mixed in with the dressing or sprinkle on top for a garnish.


Variations

Vary the Veggies.  The slaw can use any of your favorite veggies, including:

  • Different types of cabbage, like regular green cabbage or napa cabbage.
  • Shred some daikon radish, jicama, grated red onion, turnips or rutabagas.
  • Spice it up with some fresh green, red, yellow, and orange sweet peppers, or add some chopped thai chilis or jalapenos for extra heat.

Extra Crunch.  How about some nuttiness – add crushed peanuts, slivered almonds, sunflower seeds or sesames seeds.  Or how about chinese noodles?

Fruit it Up.  Fruit always adds extra flavor, texture and healthiness.  Mandarin oranges would be perfect in this, or cubed papaya, pineapple, or mango.

Dressings.  Of course you can play with the dressings – lime cilantro, peanut dressing, sesame ginger, rice wine vinaigrette.  But this Creamy Miso dressing is so good, you’ve gotta try it.

I wouldn’t make too many tweaks to the dressing; but I did waiver just a bit because I was missing some ingredients. I didn’t add onion, I used all regular sesame oil rather than the regular and toasted sesame oils, i did not add sesame seeds, and I used a spanish paprika in lieu of cayenne.  It was still fantastic!

Fresh ginger is a must, of course. You’ll likely find tahini (sesame butter) in the peanut butter section or in the ethnic foods section (Indian perhaps?).  You’ll find miso in the fridge/freezer section. All will now be a staple in my house as I’ll be making this dressing for salads, veggie dips, over seafood, as a dipping sauce, even over cold asian rice noodles, or in spring rolls. I can’t wait to start playing with all the possibilities!

The best surprises come from happy accidents.  

Mango Mojitos by the Pitcher

If I make a cocktail, it’s usually by the pitcher, and this is one of my most requested recipes. I varied this one from Steve Raichlen’s original Mojitos recipe, which in my opinion is outstanding. Not sure how he’d feel about my tweaks, but my lady friends seem to approve and continue to request them whenever they come to visit.

Mango Mojitos

In 2 qt pitcher, add…

  • 1/2 cup sugar
  • 4-6 sprigs of mint

Use the back of a wooden spoon to crush the mint with the sugar.

Add…

  • 1 cup lemon/orange/citrus flavored rum
  • 1/2 cup fresh or ReaLime or other quality bottled lime juice
  • 1/2 cup canned mango nectar (hispanic foods section)

Stir until sugar is dissolved.

  • 3 cups club soda, 2 cups Fresca

Give it a light stir.

Fill mojito or other glasses with ice, pour and serve.

Variations

Musical Fruits. This is a fun recipe to play with because you can virtually substitute any type of fruit juice for the mango, or you can forego the mango completely and stick with the traditional lime juice. There’s guava, passion fruit and peach nectars. I’ve also seen honeydew mojitos, grapefruit mojitos, and berry mojitos. Fresh juice is always best, but the nectars in the can seem to work well, and if you find a good quality lime juice like RealLime or a good bottled key lime juice, then that should work fine, and it certainly makes easier work for throwing these babies together.

The Soda. For a drier, more traditional mojito, stick to just club soda or seltzer. I do like to use different flavored seltzers – lime, lemon, peach. They all add flavor to the drink without sweetening it up. If you prefer something a little sweeter with lots of citrus fruit flavor, then try Fresca. I do my 3 parts club to 2 parts Fresca mix, which sweetens it up just enough. You might even prefer using a lemon lime soda like Sprite or 7-up. In which case, you can adjust the amount of sugar added to control the sweetness.

Skinny Girl Mojito. If you’re keeping it light, then Splenda works just as well in place of sugar. That and diet soda or club soda will keep your drink light in calories.

The Rum. You can’t go wrong with flavored rums. I prefer the lemon Bacardi. It really adds a nice citrus tang to this drink. There’s also citrus, mango, tropical, passion fruit, orange…even coconut.

The Kiddies Need a Drink Too.  Leave out the rum for a tasty, refreshing, summer citrus mojito-style punch.  Dress these drinks up in plastic cocktail glasses with a sprig of mint and the little kids will feel like one of the big kids.

It doesn’t get more summer than mojitos, and these are a definite party pleaser, super simple to whip up, and with all the options available, you never have to make the same mojito twice!

The best surprises come from happy accidents.

Black Bean Mango Salsa

After the grilled mac and cheese sandwich blog, I felt the need to redeem myself with something a bit healthier, but equally delicious.

Black bean mango salsa is packed with flavor, color and healthy ingredients. A great sweet and savory condiment with burgers, fish, pork or chicken, or vegetarian dishes. Of course, you can also serve it with tortilla chips or pita chips. Its super easy, and the variations can go in any direction.

Black Bean Mango Salsa

Ingredients

2 large mangos, cut in small cubes
1 14-oz can black beans, rinsed and drained
1 large red pepper, chopped
1 bunch (~5) green onions, sliced
1/3 cup chopped cilantro
Juice from 1/2 lime
1/2 tbsp honey
1/2 – 1 tsp fruity habanero hot sauce
Salt to taste

Directions

  • Add all ingredients in a large bowl and gently combine.
  • Let set for about 20 minutes in fridge to let the flavors blend.

Variations

  • This recipe can go spicy, sweet, sour, asian, hawaiian, indian, mediterranean or caribbean with just a few small tweaks.
  • Spice it up with fresh ginger, cinnamon or nutmeg.
  • Try some different fruits, like peaches, apricots, papaya, persimmons, guava or passion fruit.
  • Fruity heat works great for this salsa. Experiment with different hot sauces, add fresh jalapeño, habaneros, serranos or thai chiles; or add some smokey heat with chipotle.
  • In place of honey you can use regular sugar, brown sugar, agave nectar, or fruit preserves. Perhaps add a little fruity schnapps.
  • Replace the beans with black eyes peas, kidney beans, chick peas, cannelloni beans, or green peas.
  • Make it a side dish by adding some grains – quinoa, couscous, barley, bulgar, or rice would turn this into a fantastic cold salad or warmed side dish.
  • Throw in some chopped SPAM, ahi tuna, chopped pork tenderloin, chicken, tofu, or seafood.
  • Throw it in salads, or just keep it around for some healthy snacking.

A great accompaniment for any cookout, this salsa has tons of potential and is a standard summer favorite in our house.   Enjoy!

The best surprises come from happy accidents. 

Evil Grilled Mac and Cheese Sandwich

As though the Aunt Paula’s Prego Mac and Cheese recipe that I posted last week isn’t evil enough, my husband sent me a link to an even more evil recipe from a blog called Yum Sugar:

How to Make a Grilled Mac and Cheese Sandwich

That’s right, a grilled mac and cheese sandwich!  Who comes up with this stuff?  Of course we just happened to have leftover mac and cheese in the fridge, so I made an emergency run to the grocery store to get a nice thick loaf of italian bread.

Here’s our simplified version…

Grilled Mac and Cheese Sandwich

Ingredients
  • Two thick slices of bread – we used italian and it worked great
  • Velveeta, several thin slices (only the best processed cheese food on earth!)
  • Real butter
  • Leftover macaroni and cheese – a pre-baked square worked well, or refrigerated and congealed so it doesn’t fall apart
Instructions
  1. Heat a flat skillet – medium heat.
  2. Butter one side of a slice of bread. Lay it down on a cutting board, buttered side down.
  3. Layer on Velveeta slices, then macaroni and cheese, then more Velveeta slices, then other slice of bread.
  4. Lay sandwich in the skillet buttered side down.
  5. While that side cooks, butter the other side.
  6. When bottom is brown, flip the sandwich and brown the other side.
  7. Hopefully all cheese is melted and everything is soft and gooey.  If not, then pop it in the microwave for several seconds to finish it off.
Wow, so many things you could do with this.  Switch the breads around, use different cheeses, add ham or prosciutto, fresh herbs, tomato, bacon, use different kinds of mac and cheese – like fettucini alfredo, beefy mac, even lasagna.
Evil….the entire concept is pure evil, and so devilishly good.  If you’re having a bad day, then this is what should be for dinner!

The best surprises come from happy accidents.   

Aunt Paula’s Prego Mac and Cheese

This recipe originated when my expectant niece, whom I shall call SB, and her naughty husband, whom I shall call MC, visited several weekends ago.  After a day of walking around town, we came home and while my niece headed straight for a nap, my husband, MC and I headed to the front yard to relax and enjoy some beverages.

At some point, Stouffer’s macaroni and cheese became the topic of discussion.  Suddenly the pressure grew in favor of macaroni and cheese for dinner.  Uh, hello!  That wasn’t part of the dinner plan, plus I’d had a beverage myself, so I wasn’t about to drive to the store.  And the fact that I had no preparations for mac & cheese only fueled the hungry mob of two.  They sipped their brews and laughed like two evil kids as I argued a losing battle.  I huffed and I puffed…and then came the clincher.  “SB LOVES macaroni and cheese so much!” said MC, “she would eat it every day if she could, and it would make her soooooo happpyyyyy.”  I could practically see my husband give the wink of assurance to MC that we would indeed be having macaroni and cheese for dinner.  Afterall, I adore my sweet little prego niece, and I didn’t want a disappointed pregnant woman in my house. Not to mention that macaroni and cheese is the one food I’d pick if I had to be stranded on a desert island.  So in truth, it wasn’t that hard of a sell.

As I transitioned to mission mode, I grabbed a bag of whole wheat egg noodles – the only pasta we had – and dug out every chunk of cheese in the fridge.  I started boiling, shredded, cubing, sizzling, melting and mixing, and before I knew it, in the oven went a nice looking pan of mac and cheese, if I do say so myself.

Of course, my niece had no idea that she was the influential factor behind a this spontaneous creation, but she seemed very happy.  And if she experienced heartburn later, then she was nice enough not to mention it.  As for MC, his first reaction was, “this would be great with bacon”. Ugh!  As though a fly by the seat, unplanned, throw together culinary creation wasn’t good enough, now it needed bacon!  Actually, bacon really would have been good in it…but then bacon makes everything taste better.

So I dedicate this post to my sweet prego niece in hopes that maybe someday she might make it for my future little great niece or nephew (no pressure!).

Here we go…

 Aunt Paula’s Prego Mac & Cheese

Ingredients

1 lb egg noodles (regular or whole wheat) or other pasta, as desired

1 cup shredded sharp white cheddar cheese

½ lb Velveeta, cubed

4 oz. cream cheese (regular or lite)

½ cup shredded Monterey Jack cheese

5-6 slices American cheese

3 tbsp real unsalted butter

¼ cup all purpose flour

2 cups milk (regular or skim)

1 tbsp onion soup mix

1/3 cup egg beaters (or 2 beaten eggs)

1 cup shredded yellow cheddar cheese

Directions

  • Preheat the oven to 400 degrees.
  • Cook the egg noodles according to package directions, leaving it just shy of al dente, so the pasta is still somewhat chewy.  Drain and rinse with cold water to cool the pasta and stop the cooking process.  The pasta will cook completely when baked.
  • Melt the butter in a medium size saucepan on medium heat until it begins to sizzle.
  • Add the flour and mix with the butter forming a roux.  Cook until the roux begins to brown.
  • Reduce the heat to low and add the milk while whisking briskly.  The mixture will thicken and a sauce will begin to form.
  • As the sauce forms, add the onion soup mix and each of the cheeses one at a time while stirring with your whisk.
  • When the cheeses are melted and the sauce is smooth, remove the pan from the heat.
  • Pour the egg beaters in a slow stream into the sauce while simultaneously whisking briskly.  This will incorporate the eggs without clumping.
  • Add the noodles to a large bowl.
  • Gently fold the sauce in with the noodles so that the noodles and sauce are evenly combined.
  • Pour the mixture into a buttered or greased 9×13-inch baking pan.
  • Evenly spread the last cup of shredded cheddar cheese over top of the casserole.
  • Cover the pan with aluminum foil and bake for 15 minutes.
  • Remove aluminum foil and bake an additional 15-20 minutes, until the casserole is bubbly and the cheese is brown and crusty.

Variations

My next attempt…
Now, this is the first and only time I’ve ever made this recipe, so there are certainly things I’ll do differently next time.  I will add bacon (thank you MC), and possibly roasted red peppers, and instead of baking it in the oven, I’ll have the husband finish it off in the smoker for that wonderful outdoorsy smoky cookout flavor.   It’s a perfect dish for large crowds.

Here are some other ideas…

Switch up the pasta.  Egg noodles give this a kinda down home taste.  Try elbow macaroni, fusili, penne, rigatoni, shells, even gnocchi.

Add meat.
 Grilled or canned chicken, bacon crumbles, canned tuna, cubed ham, ground beef (beefy mac), or kielbasa (slice it up or just place whole on top and bake).

Spice it up.
 With chopped chipotle, cayenne pepper, hot sauce, or roasted garlic.

Add veggies.
 Roasted jalapenos, poblanos, or sweet peppers; sauteed shallots, scallions, roasted chopped tomato, or corn.

Different cheeses.  
Swap the cheeses around and consider adding swiss, gruyere, asiago, feta, fontina, pepper jack or colby.

Toppings.
 Top it off homestyle with some crushed buttered breadcrumbs or seasoned croutons.

Finishing methods.  You can certainly finish off the pasta and just mix in the sauce and eat as is – just be sure to cook the sauce a bit longer after the egg has been added.  And if you’re making it for a cookout, consider finishing it on the grill or the smoker.

Slim it down.
 Here’s forewarning that this is not a healthy low fat recipe.  But I’m sure there are plenty of ways to tame it down in the fat department, using low fat milk, lower fat cheeses, skim milk, and some enriched pastas.
The outcome is creamy and flavorful, not at all dry, and perfectly crusty on top – just the way I like it.  A big crowd pleaser for sure!   Enjoy!

The best surprises always come from happy accidents 

Summer Cucumber Ranch Salad

A friend gave me this recipe several years back.  It’s super easy, only 4 ingredients, and perfect for a cookout, or just keep a batch in the fridge for lunches and snacking.  The flavors in this salad work so well together, and it’s a great way to use up that surplus of garden cucumbers.

Summer Cucumber Ranch Salad

  • 3 large english cucumbers, peeled; or 3-4 large slicing or pickling cucumbers, peeled and seeded.
  • 1 – 11 oz. can corn niblets (we like the Del Monte Summer Crisp Corn), drained
  • 1/2 large red onion, quartered and sliced thin (any sweet onions work, but red onions add nice color)
  • 1/2 cup ranch dressing.  Add more if you prefer a creamier salad.
  • Cracked pepper, to taste.

Cut the cucumbers longways, then quarter the lengths, and chop into quarter chunks.
Add the entire can of drained corn, the sliced onion, the ranch dressing, and end with cracked pepper.  Stir gently. Serve right away, or refrigerate for several hours beforehand.

Variations

I love this simple salad just as it is, but here are some ideas if you want to switch it up a bit.

Slicing – you can slice the cucumbers as small or chunky as you like – paper thin slices, thick slides, diced cubes, even sliced using a fancy wavy slicer.

Cheese – Consider adding shredded cheddar is great, swiss, monterey jack, pepper jack, blue cheese or feta crumbles, or try stirring in some soft goat cheese.

Herbs – Maybe some chopped dill, cilantro, marjoram, tarragon, or chives

Dressings – Try cheddar ranch, a cucumber dressing, thousand island, green goddess or ceasar.

Other Tasty Additions – crumbled bacon, crushed garlic, fresh or frozen green peas, edamame, pine nuts, sunflower seeds, pistachios, or chopped sweet peppers.

This salad will quickly become a summer standard – fresh, cool, creamy, crunchy and full of cucumber ranch flavor. Lots of fun ideas for variations, so make it your own and enjoy!